What is Docker?
What is virtualization?
What is a virtualization host?
What is containerization?
Containerization vs virtualization
Docker Architecture
Docker Environment
Docker Installation & Setup
Docker Common Commands
Docker File
Conclusion
What is Docker?
Docker is a platform that is used to containerize our software, using which we can easily build our applications and package them, with the dependencies required, into containers, and these containers are easily shipped to run on other machines.
Docker simplifies the DevOps Methodology by allowing developers to create templates called “images,” using which we can create lightweight virtual machines called “containers.” Docker makes things easier for software developers by giving them the capability to automate infrastructure, isolate applications, maintain consistency, and improve resource utilization. There might arise a question that such tasks can also be done through virtualization, then why choose Docker over it. It is because virtualization is not as efficient.
Why? We shall discuss this as we move along in this Docker Tutorial.
To begin with, let us understand, what is virtualization?
What is virtualization?
 Virtualization refers to importing a guest operating system on the host operating system and allowing developers to run multiple OS on different VMs while all of them run on the same host, thereby eliminating the need to provide extra hardware resources.
These virtual machines are being used in the industry in many ways:
Enabling multiple operating systems on the same machine
Cheaper than the previous methods due to less or compact infrastructure setup
Easy to recover and do maintenance if there is any failure
Faster provisioning of applications and resources required for tasks
Increase in IT productivity, efficiency, and responsiveness
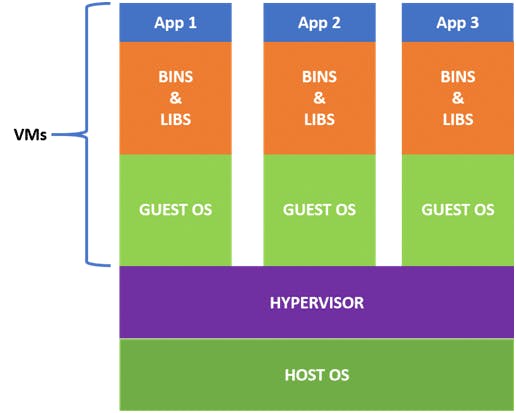
Let us check out the working of VMs with the architecture and also understand the issues faced by them.
What is a virtualization host?
From the above VM architecture, it is easy to figure out that the three guest operating systems acting as virtual machines are running on a host operating system. In virtualization, the process of manually reconfiguring hardware and firmware and installing a new OS can be entirely automated; all these steps get stored as data in any files of a disk.
Virtualization lets us run our applications on fewer physical servers. In virtualization, each application and OS live in a separate software container called VM. Where VMs are completely isolated, all computing resources, such as CPUs, storage, and networking, are pooled together, and they are delivered dynamically to each VM by a software called hypervisor.
However, running multiple VMs over the same host leads to degradation in performance. As guest OSs have their own kernel, libraries, and many dependencies running on a single host OS, it takes a large occupation of resources such as processor, hard disk, and, especially, RAM.
Also, when we use VMs in virtualization, the bootup process takes a long time that affects efficiency in the case of real-time applications. In order to overcome such limitations, containerization was introduced.
How did containerization overcome these issues? Let us discuss this further in this basic Docker Tutorial.
What is containerization?
Containerization is a technique where virtualization is brought to the level of an OS. In containerization, we virtualize OS resources. It is more efficient as there is no guest OS consuming host resources. Instead, containers utilize only the host OS and share relevant libraries and resources, only when required. The required binaries and libraries of containers run on the host kernel leading to faster processing and execution.
In a nutshell, containerization (containers) is a lightweight virtualization technology acting as an alternative to hypervisor virtualization. Bundle any application in a container and run it without thinking of dependencies, libraries, and binaries!
Now, let us look into its advantages:
Containers are small and lightweight as they share the same OS kernel.
They do not take much time, only seconds, to boot up.
They exhibit high performance with low resource utilization.
Now, let us understand the difference between containerization and virtualization in this Docker container tutorial.
Containerization vs virtualization
As we have been introduced to containerization and virtualization, we know that both let us run multiple OSs on a host machine.
 Now, what are the differences between containerization and virtualization? Let us check out the below table to understand the differences.
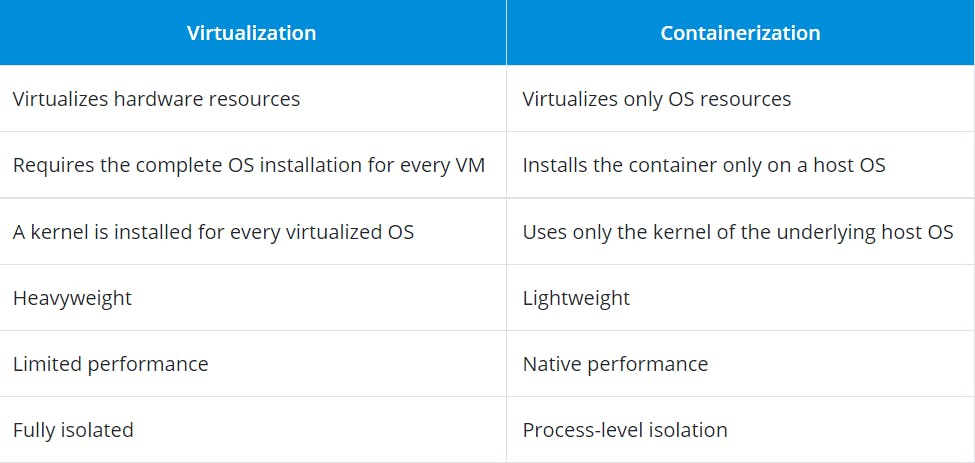
In the case of containerization, all containers share the same host OS. Multiple containers get created for every type of application making them faster but without wasting the resources, unlike virtualization where a kernel is required for every OS and lots of resources from the host OS are utilized.
We can easily figure out the difference from the architecture of containers given below:
In order to create and run containers on our host OS, we require software that enables us to do so. This is where Docker comes into the picture!
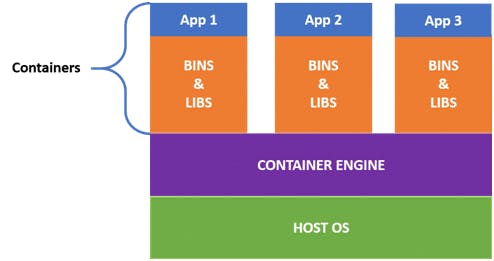
Now, in this tutorial, let us understand the Docker architecture.
Docker Architecture
Docker uses a client-server architecture. The Docker client consists of Docker build, Docker pull, and Docker run. The client approaches the Docker daemon that further helps in building, running, and distributing Docker containers. Docker client and Docker daemon can be operated on the same system; otherwise, we can connect the Docker client to the remote Docker daemon. Both communicate with each other by using the REST API, over UNIX sockets or a network.
learn from the below given docker architecture diagram.
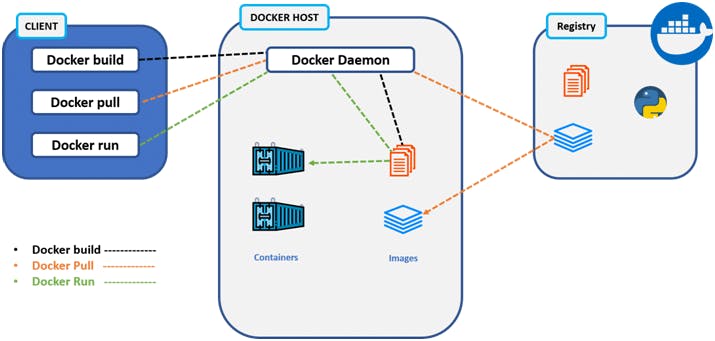
Docker Client
Docker Host
Docker Registry
Docker Client
It is the primary way for many Docker users to interact with Docker.
It uses command-line utility or other tools that use Docker API to communicate with the Docker daemon.
A Docker client can communicate with more than one Docker daemon.
Docker Host
In the Docker host, we have a Docker daemon and Docker objects such as containers and images. First, let us understand the objects on the Docker host, then we will proceed toward the functioning of the Docker daemon.
Docker objects:
What is a Docker image? A Docker image is a type of recipe or template that can be used for creating Docker containers. It includes steps for creating the necessary software.
What is a Docker container? A type of virtual machine that is created from the instructions found within the Docker image. It is a running instance of a Docker image that consists of the entire package required to run an application.
Docker daemon:
Docker daemon helps in listening requests for the Docker API and in managing Docker objects such as images, containers, volumes, etc. Daemon issues building an image based on a user’s input, and then saving it in the registry.
In case we do not want to create an image, then we can simply pull an image from the Docker hub, which might be built by some other user. In case we want to create a running instance of our Docker image, then we need to issue a run command that would create a Docker container.
A Docker daemon can communicate with other daemons to manage Docker services Docker Registry
Docker registry is a repository for Docker images that are used for creating Docker containers.
We can use a local or private registry or the Docker hub, which is the most popular social example of a Docker repository.
Docker Environment
So Docker environment is basically all the things that make Docker. They are:
Docker Engine
Docker Objects
Docker Registry
Docker Compose
Docker Swarm
Docker Engine:
Docker engine is as the name suggests its technology that allows for the creation and management of all the Docker Processes. It has three major parts to it:
Docker CLI (Command Line Interface) – This is what we use to give commands to Docker. E.g. docker pull or docker run.
Docker API – This is what communicates the requests the users make to the Docker daemon.
Docker Daemon – This is what actually does all the process, i.e. creating and managing all of the Docker processes and objects.
So, for example, if I wrote a command $sudo docker run Ubuntu, it will be using the docker CLI. This request will be communicated to the Docker daemon using the docker API. The docker daemon will process the request and then act accordingly.
Docker Objects:
There are many objects in docker you can create and make use of, let’s see them:
Docker Images – These are basically blueprints for containers. They contain all of the information required to create a container like the OS, Working directory, Env variables, etc.
Docker Containers – We already know about this.
Docker Volumes – Containers don’t store anything permanently after they’re stopped, Docker Volumes allow for persistent storage of Data. They can be easily & safely attached and removed from the different container and they are also portable from system to another. Volumes are like Hard drives
Docker Networks – A Docker network is basically a connection between one or more containers. One of the more powerful things about the Docker containers is that they can be easily connected to one other and even other software, this makes it very easy to isolate and manage the containers Docker Swarm Nodes & Services – We haven’t learned about docker swarm yet, so it will be hard to understand this object, so we will save it for when we learn about docker swarm.
Docker Installation & Setup
We can download and work with Docker on either of these platforms.
Linux
Windows
- Mac
Linux for Docker is the one of the most widely used versions, so we will also go ahead with that one. We will be specifically be working with Ubuntu (as a lot of you may already have it).
If you don’t have the OS on your system, you can use Ubuntu on VM or if you have an AWS account launch an Ubuntu instance on them.
I have launched an Ubuntu Instance here. So our first step is to go ahead and type in the following command for updating Ubuntu repo:
$sudo apt-get update
The following command installs Docker on Ubuntu:
$sudo apt install docker.io -y
So this was the easy method that does not require a lot of effort. If you are here just to learn Docker, I would recommend this method. But if you want to learn how to properly install docker check out this link: docs.docker.com/engine/install/ubuntu
Use the below command to make sure you have installed docker properly or not, if it works it will list the version of the docker that is installed:
$sudo docker –version
We will learn all of the other commands after we get an understanding of the Docker environment.
Docker Common Commands
There are a few common commands you guys will need to know to get started, I will list each one and then explain what it does.
The following command will list down the version of the Docker tool that is installed on your system and is also a good way to know if you have docker installed in your system at all or not.
$ sudo docker –version
The following command is used to pull images from the Docker registry.
$ sudo docker pull <name of the image>
So this is what it should look like when you want to pull Ubuntu image from the Docker registry:
$ sudo docker pull ubuntu

Both of the following commands are used to list down all Docker images that are there stored in the systems you are using the command in.
$ sudo docker images or $ sudo docker image ls
So if you had only one image (an Ubuntu one) then this is what you should be seeing.

The following command will run an existing image and create a container based on that image.
$ sudo docker run <name of the image>
So if you wanted to create an Ubuntu container based on an Ubuntu image it will look something like this:
$ sudo docker run –it –d ubuntu

Now here you will notice that I included two flags; -it & -d
It – interactive flag, allows the container that was created to be interactive
d – Detach flag, allows the container to run in the foreground. Once you have created a running container, you would want to know if it exited or is still running. For that reason you can use the following command, it basically lists all the running containers:
$ docker ps
Now if you wanted to see both exited containers and running containers then you can go ahead and the –a flag like so:
$ sudo docker ps –a

To stop a container you can use this command:
$ sudo docker stop <name of the container>
Like so:

If you want to kill a container then you can use this command:
$ sudo docker kill <name of the container>

If you want to remove any container either stopped or running you can go ahead and use this command:
$ sudo docker rm –f <name of the container>

Disclaimer: kill, stop and rm commands are different in the matter that stop allows for slow and steady stoppage of a container whereas kill command kills containers quickly and rm is basically used for clean-up purpose.
Docker File
So now we know the most basic docker commands, we can move on to learn how to create our own image.
To create a new image/ custom image you need to write a text file called dockerfile. In this file, you need to mention all of the instructions that will let docker know what to include in the image.
To understand this better let’s look at an example.
 Here we are trying to create a container with the base image of Ubuntu latest version and running the commands to update the instance and install apache web server on it. And finally, the working directory is mentioned to be /var/www/html.
These are called instructions. There are many different types of instructions to use, such as:
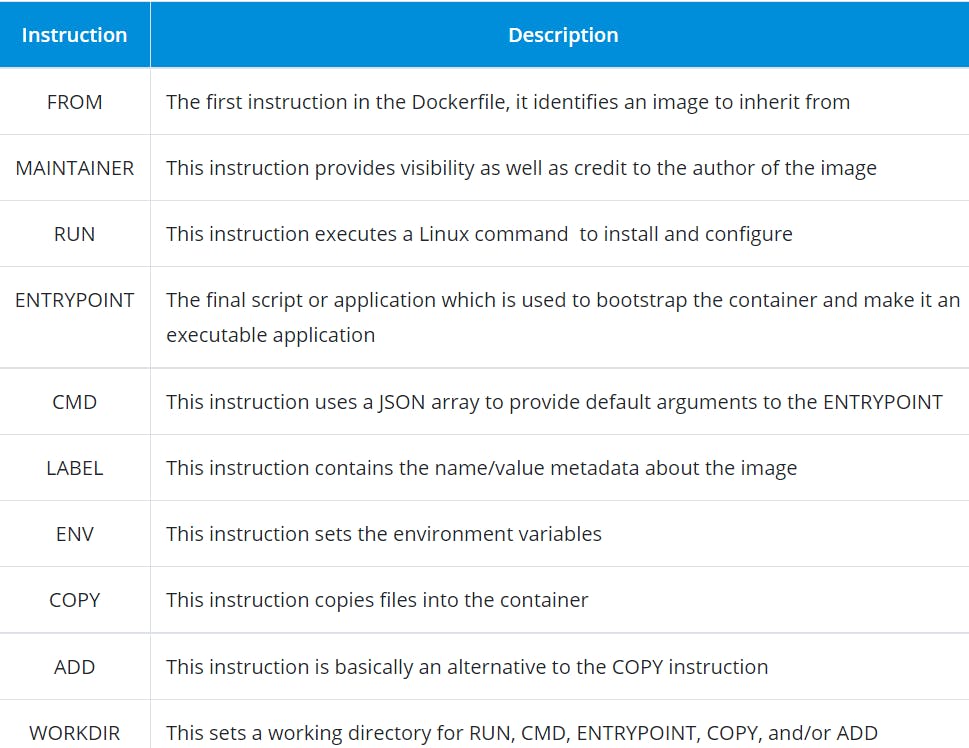

Conclusion
So, we learned today a lot about Docker, it is a tool that we use to maintain consistency across the development pipeline of software development and it also helps us to manage and deploy software as microsystems. It has many different components that help it become the amazing tool it is. I would recommend to anyone reading this to start learning more and more about Docker as what I cover here is just a drop in the ocean, do this especially if you want to get into DevOps.